Introduction to Pumpkin Pie
Pumpkin pie holds a special place in the hearts of many, especially during the fall and winter seasons. This classic dessert, with its rich, spiced pumpkin filling and buttery crust, is a staple at holiday gatherings, particularly during Thanksgiving in the United States.
A Brief History of Pumpkin Pie
Pumpkin pie has deep roots in American culinary tradition. It dates back to the early settlers who brought pumpkin seeds with them from England and learned to incorporate the native squash into their cooking. Over time, the pie evolved from a simple baked pumpkin dish into the deliciously spiced dessert we know today. According to historians, the first recorded recipe for pumpkin pie appeared in an American cookbook in the late 18th century.
Why Pumpkin Pie Is Essential for the Holidays
There are several reasons why pumpkin pie remains a beloved holiday dessert:
- Tradition: For many families, making and enjoying pumpkin pie is an essential part of their holiday traditions. The pie often serves as the grand finale of a Thanksgiving feast.
- Seasonal Ingredients: Pumpkin is in peak season during the fall, making it the ideal time to bake this savory dessert. The spices typically used in pumpkin pie—like cinnamon, nutmeg, and cloves—also evoke the cozy warmth of the season.
- Versatility: Pumpkin pie can be adapted to fit various dietary needs. Whether you need a vegan pumpkin pie or a gluten-free version, there’s a recipe that can accommodate everyone at the table.
Moreover, pumpkin pie isn’t just about the taste—it’s about the memories and the sense of nostalgia it brings. When the smell of freshly baked pumpkin pie fills the air, it instantly transports us back to holidays spent with loved ones.
In addition to its cultural significance, pumpkin pie is also celebrated for its nutritional benefits. Pumpkin is rich in vitamins, fiber, and antioxidants, making this dessert a healthier option compared to many other sweets. To learn more about the health benefits of pumpkin and how it compares to other ingredients, you might be interested in checking out some nutritional guides on the topic.
As you embark on your pumpkin pie journey, you’ll find that this dessert offers much more than just a sweet ending to a meal—it’s a symbol of celebration and togetherness. So, whether you’re a seasoned baker or trying your hand at pumpkin pie for the first time, understanding its history and significance will make your baking experience all the more meaningful.
Ingredients for Pumpkin Pie
Creating the perfect pumpkin pie begins with selecting the right ingredients. The quality and combination of these elements can significantly impact the final product, ensuring your pie is both flavorful and satisfying.
Essential Ingredients
At its core, a traditional pumpkin pie recipe calls for a few key ingredients:
- Pumpkin Purée: The star of the show is, of course, the pumpkin purée. You can use either canned pumpkin or freshly prepared pumpkin purée. Canned pumpkin is a convenient option and provides a consistent texture, but if you prefer a more authentic taste, you might opt for fresh pumpkin. If you’re curious about how fresh pumpkin affects the texture and flavor, you can check out this guide for more details.
- Sweeteners: To bring out the natural sweetness of the pumpkin, most recipes include sugar or brown sugar. Brown sugar adds a deeper, molasses-like flavor that pairs beautifully with the spices.
- Spices: The signature flavor of pumpkin pie comes from a blend of warm spices, typically including cinnamon, nutmeg, ginger, and cloves. These spices not only enhance the pumpkin’s flavor but also evoke the comforting essence of fall.
- Eggs: Eggs are essential for binding the ingredients together, giving the pie its smooth, custard-like texture.
- Evaporated Milk or Cream: For a rich and creamy filling, you’ll need either evaporated milk or heavy cream. Evaporated milk is the more traditional choice, but heavy cream can give your pie a more luxurious texture.
- Pie Crust: A buttery, flaky pie crust serves as the foundation for your pumpkin pie. You can use a store-bought crust for convenience, but a homemade crust adds a personal touch that can elevate your dessert.
Best Type of Pumpkin to Use
When it comes to choosing the type of pumpkin for your pie, you have two main options: canned pumpkin and fresh pumpkin.
- Canned Pumpkin: Most bakers prefer canned pumpkin because it’s convenient and reliable. It provides a consistent texture and flavor, ensuring your pie turns out well every time. Libby’s, one of the most popular brands, even offers a version specifically designed for pie-making.
- Fresh Pumpkin: If you’re aiming for a more natural and less processed option, fresh pumpkin is the way to go. Choose small sugar pumpkins or pie pumpkins, as they are sweeter and less watery than larger carving pumpkins. However, preparing fresh pumpkin requires additional steps, such as roasting and puréeing the pumpkin flesh.
Substitutes and Variations
For those with dietary restrictions or preferences, there are several ways to modify the traditional pumpkin pie recipe:
- Dairy-Free: Substitute the evaporated milk or cream with coconut milk or almond milk to make the pie dairy-free.
- Sugar-Free: Replace the sugar with a natural sweetener like maple syrup or honey.
- Gluten-Free Crust: Opt for a gluten-free pie crust or a graham cracker crust as a tasty alternative.
Exploring different ingredients and variations can help you tailor the pie to suit your needs and preferences. For more creative ideas on pumpkin-based desserts, you can explore the Pumpkin Banana Loaf recipe, which offers a unique twist on traditional pumpkin treats.
By carefully selecting and balancing these ingredients, you ensure that your pumpkin pie not only tastes delicious but also meets the dietary needs of everyone at the table.
Step-by-Step Guide to Making Pumpkin Pie
Making a pumpkin pie from scratch may seem intimidating, but by following a step-by-step guide, you can achieve a perfect pie that’s sure to impress. This section will walk you through the entire process, from preparing the crust to serving the finished dessert.
Preparing the Crust
The crust is the foundation of your pumpkin pie, and a well-made crust can elevate the entire dessert. Whether you opt for a homemade crust or a store-bought one, it’s important to ensure the crust is sturdy enough to hold the filling while remaining tender and flaky.
Homemade Crust
If you choose to make a homemade crust, you’ll need the following ingredients:
- Flour (all-purpose or gluten-free)
- Butter (cold and unsalted)
- Salt
- Sugar (optional)
- Ice Water
Steps for making the crust:
- Combine the dry ingredients: In a large mixing bowl, whisk together the flour, salt, and sugar (if using).
- Cut in the butter: Add cold butter cubes to the flour mixture. Use a pastry cutter or your hands to cut the butter into the flour until the mixture resembles coarse crumbs.
- Add ice water: Gradually add ice water, one tablespoon at a time, until the dough begins to come together. It should be moist but not sticky.
- Form the dough: Gather the dough into a ball, flatten it into a disk, and wrap it in plastic wrap. Chill it in the refrigerator for at least 30 minutes.
- Roll out the dough: On a lightly floured surface, roll out the chilled dough into a circle that is about 1/8-inch thick. Transfer it to your pie dish, trimming any excess dough and crimping the edges as desired.
For those who prefer a quick and easy option, a store-bought crust can also be used. Simply follow the package instructions to prepare it for filling.
Making the Pumpkin Filling
The pumpkin filling is the heart of the pie, and getting it just right is essential. This filling combines pumpkin purée, spices, sweeteners, and dairy to create a rich, creamy texture and a flavor profile that is both sweet and spicy.
Ingredients for the filling:
- Pumpkin Purée (canned or homemade)
- Brown Sugar or granulated sugar
- Spices: Cinnamon, nutmeg, ginger, cloves
- Salt
- Eggs
- Evaporated Milk or heavy cream
- Vanilla Extract (optional)
Steps for making the filling:
- Preheat the oven: Start by preheating your oven to 425°F (220°C). This ensures the oven is hot enough to set the filling and bake the crust properly.
- Mix the dry ingredients: In a small bowl, combine the sugar, spices, and salt. Mixing these together before adding to the wet ingredients ensures an even distribution of spices in the filling.
- Whisk the wet ingredients: In a separate large bowl, whisk the pumpkin purée with the eggs until smooth. Gradually add the sugar-spice mixture, followed by the evaporated milk or cream, and continue whisking until all ingredients are fully incorporated.
- Add vanilla extract: For an added depth of flavor, you can stir in a teaspoon of vanilla extract.
Assembling and Baking the Pie
Once your crust and filling are ready, it’s time to assemble and bake your pumpkin pie. This stage requires some attention to detail to ensure the pie bakes evenly and the crust doesn’t burn.
Steps for assembling and baking:
- Pour the filling into the crust: Carefully pour the pumpkin filling into the prepared pie crust. If you’re using a deep-dish pie pan, you might not need to use all of the filling. Fill the crust just until the filling reaches the top edge of the crust.
- Bake at high heat: Place the pie in the preheated oven and bake for 15 minutes at 425°F (220°C). This initial burst of heat helps to set the crust and filling.
- Lower the temperature: After 15 minutes, reduce the oven temperature to 350°F (175°C) and continue baking for 40-50 minutes. The pie is done when the edges are set, but the center is still slightly jiggly.
- Prevent crust burning: If the crust edges begin to brown too quickly, cover them with a pie shield or strips of aluminum foil to prevent burning.
Cooling and Setting the Pie
After baking, it’s crucial to let the pie cool and set properly before serving. Cutting into a hot pie can result in a runny filling that hasn’t had time to firm up.
Steps for cooling:
- Cool on a wire rack: Once out of the oven, place the pie on a wire rack and allow it to cool at room temperature for at least 2 hours. This cooling time allows the filling to fully set.
- Refrigerate if needed: If you’re not serving the pie immediately, you can refrigerate it to keep it fresh. Cover the pie loosely with plastic wrap or aluminum foil to prevent it from drying out.
For additional tips on how to store and reheat your pumpkin pie, check out this guide on storing pumpkin desserts.
Serving the Perfect Pumpkin Pie
After all your hard work, it’s time to enjoy your pumpkin pie. Serve slices with a dollop of whipped cream or a scoop of vanilla ice cream for a classic finish. For a twist, consider topping your pie with a sprinkle of cinnamon or a drizzle of caramel sauce.
By following these steps, you’ll create a pumpkin pie that’s not only visually appealing but also bursting with flavor. Whether you’re making it for a holiday gathering or simply as a treat for yourself, this pie is sure to be a hit. And remember, the more you practice, the better your pies will become, so don’t hesitate to experiment with different techniques and ingredients to make the recipe your own.
Pumpkin Pie Variations
While the classic pumpkin pie is beloved by many, there are countless ways to tweak the traditional recipe to suit different tastes and dietary needs. From vegan and gluten-free options to creative flavor additions, these variations can make your pumpkin pie even more special and unique.
Vegan Pumpkin Pie
For those who follow a plant-based diet or are lactose intolerant, a vegan pumpkin pie is a fantastic option. This variation replaces dairy and eggs with plant-based alternatives, without sacrificing flavor or texture.
Key substitutions:
- Coconut Milk: Use full-fat coconut milk instead of evaporated milk or heavy cream. Coconut milk provides a rich, creamy texture that complements the pumpkin filling.
- Flaxseed or Chia Seed “Eggs”: Replace the eggs with flaxseed or chia seed “eggs.” To make one flax egg, mix one tablespoon of ground flaxseed with three tablespoons of water and let it sit for a few minutes to thicken. This mixture helps to bind the filling similarly to traditional eggs.
- Maple Syrup: Opt for maple syrup as a natural sweetener to enhance the pie’s flavor while keeping it vegan.
For more details on making vegan desserts, you might find this vegan pumpkin muffins recipe helpful.
Gluten-Free Pumpkin Pie
A gluten-free version of pumpkin pie is perfect for those with gluten sensitivities or celiac disease. The key is to use a gluten-free crust that still offers the same flakiness and flavor as a traditional crust.
Gluten-free crust options:
- Almond Flour Crust: Almond flour is a popular choice for gluten-free baking due to its fine texture and slightly nutty flavor. This crust pairs well with the pumpkin filling and adds a subtle richness to the pie.
- Oat Flour Crust: Another great option is oat flour, which is naturally gluten-free and gives the crust a hearty, wholesome taste. Ensure that you use certified gluten-free oats to avoid cross-contamination.
If you’re interested in more gluten-free recipes, you can explore the almond flour pumpkin muffins for inspiration.
Pumpkin Pie with a Graham Cracker Crust
For a twist on the traditional pie crust, try using a graham cracker crust. This variation adds a slightly sweet and crunchy texture that complements the creamy pumpkin filling. It’s also incredibly easy to prepare, making it a great option for those who want to save time without compromising on flavor.
Steps to make a graham cracker crust:
- Crush the graham crackers: Place about 10-12 graham crackers in a food processor and pulse until finely ground.
- Mix with melted butter and sugar: In a bowl, combine the graham cracker crumbs with melted butter and a bit of sugar, stirring until the mixture resembles wet sand.
- Press into the pie dish: Press the mixture firmly into the bottom and sides of your pie dish to form the crust. Pre-bake the crust at 350°F (175°C) for about 10 minutes before adding the filling.
Adding Spices and Flavors
To take your pumpkin pie to the next level, consider adding additional spices or flavors. While the classic spice blend of cinnamon, nutmeg, ginger, and cloves is always a winner, you can experiment with:
- Maple Syrup: Add a few tablespoons of maple syrup to the filling for a richer sweetness.
- Bourbon: A splash of bourbon in the filling can add a subtle depth of flavor and a touch of warmth.
- Chocolate Chips: Sprinkle a handful of chocolate chips into the filling before baking for a deliciously indulgent twist.
For more creative ideas on adding flavors to pumpkin-based desserts, you might want to check out the delicious pumpkin chocolate chip muffins recipe, which combines the richness of chocolate with the spiciness of pumpkin.
These variations allow you to customize your pumpkin pie to fit any dietary needs or flavor preferences, ensuring that everyone at your table can enjoy this beloved dessert. Whether you’re looking for a vegan option, a gluten-free crust, or a new twist on the classic recipe, these ideas will help you create a pie that’s both delicious and memorable.
Serving Suggestions for Pumpkin Pie
Once your pumpkin pie is perfectly baked and cooled, it’s time to think about how to serve it in a way that enhances its flavors and presentation. The right accompaniments can elevate your pie from a simple dessert to a memorable culinary experience.
Classic Toppings
The most traditional way to serve pumpkin pie is with a generous dollop of whipped cream. The lightness of the whipped cream balances the rich, spiced filling, creating a harmonious flavor profile.
- Whipped Cream: You can use store-bought whipped cream, but making your own is simple and adds a homemade touch. To make it, whip heavy cream with a little sugar and vanilla until soft peaks form.
- Ice Cream: A scoop of vanilla ice cream is another classic option. The cold, creamy texture contrasts beautifully with the warm spices of the pie. For a twist, try serving the pie with cinnamon or maple ice cream for added depth of flavor.
If you’re looking for more ways to add a creamy topping to your pumpkin-based desserts, you might find this guide on pumpkin muffins helpful.
Pairing with Beverages
Choosing the right beverage can also enhance the flavors of your pumpkin pie. Here are some pairing ideas:
- Coffee or Espresso: The robust flavors of coffee complement the spices in the pie. Consider serving the pie with a shot of espresso or a cup of strong black coffee.
- Tea: Herbal teas like chai or cinnamon are excellent choices. Their spiced notes echo the flavors of the pie, creating a cohesive tasting experience.
- Dessert Wine: For a more indulgent pairing, consider a sweet dessert wine, such as Sauternes or Moscato. The sweetness of the wine can enhance the pumpkin’s natural sweetness and the richness of the filling.
Presentation Tips
Finally, how you present your pumpkin pie can make a big difference in how it’s received. Here are a few tips to ensure your pie looks as good as it tastes:
- Garnishes: Sprinkle a little ground cinnamon or nutmeg over the whipped cream for a decorative touch. You could also add a drizzle of caramel sauce for extra indulgence.
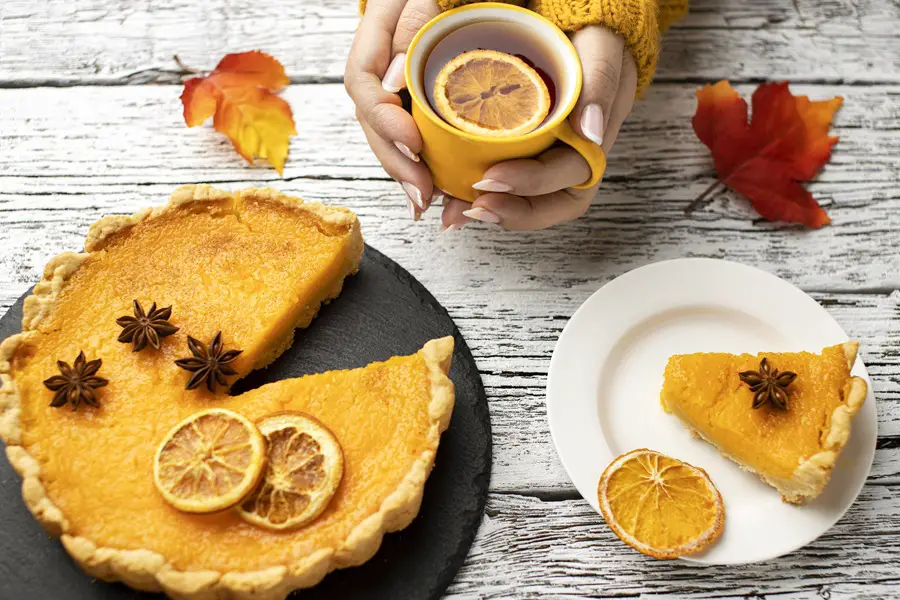
- Serving Plates: Use festive or elegant plates that complement the colors of the pie. Dark-colored plates can make the bright orange of the pumpkin filling pop.
- Cutting the Pie: Use a sharp knife to cut clean slices. For best results, wipe the knife between cuts to keep the slices neat.
For more ideas on how to serve pumpkin desserts, check out this guide on flavor pairings that might inspire some creative combinations.
By considering these serving suggestions, you can ensure that your pumpkin pie not only tastes incredible but also makes a lasting impression on your guests. Whether you’re serving it at a holiday feast or simply enjoying a slice on a cozy evening, these tips will help you get the most out of your delicious creation.
Tips for Storing and Reheating Pumpkin Pie
After baking your pumpkin pie, proper storage and reheating are crucial to maintaining its flavor and texture. Whether you’re preparing the pie ahead of time or saving leftovers, following these tips will ensure your pie remains fresh and delicious.
Storing Pumpkin Pie
Pumpkin pie should be stored correctly to prevent it from becoming soggy or losing its flavor. Here’s how to keep your pie fresh:
- Room Temperature: If you plan to serve the pie within a few hours of baking, you can leave it at room temperature. However, avoid leaving it out for more than two hours to prevent spoilage.
- Refrigeration: For longer storage, cover the pie loosely with plastic wrap or aluminum foil and store it in the refrigerator. A properly stored pumpkin pie will last for up to 3-4 days in the fridge. Make sure to place it on a flat surface to prevent the filling from shifting.
- Freezing: You can also freeze pumpkin pie for extended storage. To do this, wrap the pie tightly in plastic wrap, followed by a layer of aluminum foil, to prevent freezer burn. The pie can be frozen for up to 1-2 months. When ready to serve, thaw the pie overnight in the refrigerator.
For additional tips on how to store various pumpkin desserts, you might want to explore this guide on storing baked goods for more insights.
Reheating Pumpkin Pie
Reheating pumpkin pie correctly will help restore its fresh-baked flavor without compromising the texture of the crust or filling. Here’s the best way to reheat your pie:
- Oven Reheating: Preheat your oven to 350°F (175°C). Place the pie on a baking sheet and cover the crust edges with aluminum foil to prevent over-browning. Reheat the pie for 10-15 minutes, or until it’s warmed through. This method ensures the crust remains crisp while the filling becomes warm and fragrant.
- Microwave Reheating: If you’re short on time, you can reheat individual slices in the microwave. Place a slice on a microwave-safe plate and heat it on medium power for 20-30 seconds. While the microwave is faster, it can cause the crust to become soft, so it’s not the best option for reheating the entire pie.
- Serving at Room Temperature: If you prefer, you can serve the pie at room temperature. Simply remove the pie from the refrigerator about 30 minutes before serving to allow it to come to room temperature naturally.
By following these storage and reheating tips, you can enjoy your pumpkin pie at its best, even days after it’s been baked. Whether you’re planning ahead for a big holiday meal or savoring the last slice of leftovers, these methods will help keep your pie as delicious as when it was first made. For more detailed information on reheating and storing similar desserts, you can refer to this comprehensive guide on baking tips.
Common Mistakes to Avoid When Making Pumpkin Pie
Even with the best intentions, it’s easy to make mistakes when baking a pumpkin pie. Understanding and avoiding these common pitfalls will help you achieve a perfectly baked pie every time.
Overbaking the Pie
One of the most common mistakes is overbaking the pie. Pumpkin pie filling is a custard, and like any custard, it continues to cook after being removed from the oven. Overbaking can lead to a cracked and dry filling.
- Tip: To avoid overbaking, check the pie about 5 minutes before the recommended baking time is up. The filling should be set around the edges but still slightly jiggly in the center. As the pie cools, the center will continue to set, resulting in a perfectly smooth and creamy texture.
Using the Wrong Type of Pumpkin
Another frequent error is using the wrong type of pumpkin. Not all pumpkins are created equal, and using a carving pumpkin can lead to a watery filling with less flavor.
- Tip: Always use sugar pumpkins or pie pumpkins for your filling, as they are sweeter and have a denser flesh. If you prefer using canned pumpkin, ensure it’s 100% pure pumpkin purée, not pumpkin pie filling, which contains added sugars and spices that can throw off your recipe. For more guidance on choosing the right type of pumpkin, you can check out this pumpkin selection guide.
Not Letting the Pie Cool Properly
Impatience can lead to cutting into the pie before it’s fully cooled, resulting in a runny filling that hasn’t had time to set.
- Tip: After baking, allow your pumpkin pie to cool on a wire rack at room temperature for at least 2 hours. This step is crucial to ensure the filling firms up properly. If you’re planning to store it, let it cool completely before refrigerating.
Neglecting the Crust
Focusing too much on the filling and neglecting the crust is another common mistake. A soggy bottom crust can ruin the texture of your pie.
- Tip: To prevent a soggy crust, consider blind baking your pie crust before adding the filling. This involves baking the crust partially with pie weights before filling it. Additionally, ensure the edges of the crust are protected with foil or a pie shield during baking to prevent them from burning. For more tips on making the perfect crust, explore this crust preparation guide.
By being mindful of these common mistakes, you can avoid the most frequent pitfalls that many bakers encounter. Taking the time to follow these tips will ensure your pumpkin pie turns out beautifully every time—smooth, creamy, and bursting with flavor. For more in-depth advice on perfecting your pie, you might find this comprehensive baking guide helpful.
FAQs Section
When making pumpkin pie, several questions often arise, especially for those trying the recipe for the first time. In this section, we’ll address some of the most frequently asked questions to help you achieve the best results.
What is the difference between pumpkin pie and sweet potato pie?
Both pumpkin pie and sweet potato pie are beloved fall desserts, but they have some distinct differences in flavor and texture.
- Pumpkin Pie: Pumpkin pie is made with pumpkin purée, which has a lighter, more custard-like texture and a mild, earthy flavor. The spices, such as cinnamon, nutmeg, and ginger, play a significant role in defining the taste of pumpkin pie.
- Sweet Potato Pie: Sweet potato pie, on the other hand, tends to be sweeter and denser. The natural sweetness of the sweet potatoes adds a richer flavor, and the texture is often silkier. Additionally, sweet potato pie may use similar spices, but the sweet potato’s natural sweetness can sometimes allow for less sugar in the recipe.
For those interested in trying a sweet potato variation, consider experimenting with the spices and sweetness levels to suit your preferences. You can explore more on flavor differences in this flavor pairing guide.
Can I use a store-bought crust for my pumpkin pie?
Absolutely! Using a store-bought crust is a convenient option, especially if you’re short on time. It allows you to focus more on perfecting the filling.
- Tip: To enhance the flavor of a store-bought crust, consider brushing it with melted butter and a sprinkle of sugar before pre-baking. This simple step can add a homemade touch to your pie. Additionally, pre-baking (or blind baking) the crust before adding the filling can help prevent it from becoming soggy. For more tips on handling pie crusts, you can visit this guide on crust preparation.
How do I know when my pumpkin pie is done?
Knowing when your pumpkin pie is fully baked can be tricky, but there are a few signs to look for:
- Visual Check: The pie should be set around the edges but still slightly jiggly in the center. The filling will continue to firm up as it cools.
- Knife Test: Insert a thin knife into the center of the pie. If it comes out mostly clean (a few moist crumbs are okay), the pie is done. However, this test may leave a small mark on the pie’s surface, so it’s best to use it as a last resort.
- Temperature: If you have a kitchen thermometer, the internal temperature of the pie should reach about 175°F (79°C) when it’s fully cooked.
For more tips on achieving the perfect bake, refer to this comprehensive baking guide.
Can pumpkin pie be made ahead of time?
Yes, pumpkin pie is an excellent make-ahead dessert, which is why it’s so popular during the busy holiday season.
- Refrigeration: After baking, let the pie cool completely, then cover it with plastic wrap or aluminum foil and refrigerate. It can be stored in the fridge for up to 3-4 days.
- Freezing: If you need to make the pie well in advance, you can freeze it. Wrap the cooled pie tightly in plastic wrap and then in aluminum foil. When ready to serve, thaw the pie overnight in the refrigerator and reheat it in the oven if you prefer it warm.
Making your pumpkin pie ahead of time not only saves you time on the day of your event but also allows the flavors to meld and develop, often resulting in an even more delicious dessert. For more details on storing and reheating, see this guide on storing pumpkin desserts.
By addressing these common questions, we hope to make your pumpkin pie baking experience smoother and more enjoyable. Whether you’re a first-time baker or a seasoned pro, these tips will help you achieve a pie that’s sure to impress.
Conclusion
In conclusion, making the perfect pumpkin pie is a rewarding experience that combines tradition with creativity. From selecting the best ingredients to mastering the baking process, every step contributes to creating a dessert that’s not only delicious but also a symbol of togetherness during the holiday season.
By exploring various pumpkin pie variations, understanding the importance of proper storage and reheating, and avoiding common mistakes, you can ensure your pie turns out beautifully every time. Whether you’re baking for a special occasion or simply enjoying a slice on a cozy evening, the tips and techniques shared in this guide will help you achieve success.
Moreover, don’t forget the importance of presentation and pairing your pie with the right toppings and beverages. A well-served pumpkin pie can elevate your dining experience, making it even more memorable for you and your guests.
Finally, remember that the joy of baking lies in the details. Take the time to enjoy the process, experiment with new flavors, and most importantly, share your pumpkin pie with loved ones. For more inspiration and tips on pumpkin-based recipes, explore the nutritional guides and other related content available on this site.